Learn HTML
Learn CSS
Learn Javascript
Django Introduction
Django Project & File Structure
Django Create & Structure Directory of Application
Django View
Django Template
Django Dynamic Templates Using DLT
Django if,elif,else & for loop tags
Django Static Files
Django Template & Static File Inheritance
Django Hyperlinks
django Get Post Csrf
Django Administration
Django Model class
Django Form
Django Get Form Data & Data Validation
Django Redirect Page After Submit
Django Save,Update & Delete Form in database
Django Dynamic URL
Django User Authentication System
User authentication system using django
What is django user authentication?
Django user authentication handle an user permissions, accounts, cookies and groups. This authentication system is provided by django. In this system authentication and authorization both are included. The configuration is already done by django.
What is UserCreationForm?
Look this form is already created. We have to just use it. If any modification is needed then we can do that.
This form is created in user authentication system.
Before create a form let's learn some things:
User object fields in UserCreationForm:
This filed can contain characters and alphanumeric like +, -, _, etc. The default length of this field is 150 characters and this field is required. If you want to do any modification then you can do it.
This is an optional field. Default length is 30. If you want to do any modification then you can do it.
This is an optional field. Default length is 150. If you want to do any modification then you can do it.
This field is optional. If you want to do any modification then you can do it.
This field is required.
It takes boolean value True or False. is_staff designates is a user can access the admin site or not. A user can access the admin site if the value of is_staff is True
It takes boolean value True or False. is_active designates is a user active or not.
It takes boolean value True or False. is_active gives a user all the permission.
It has a user last login data and time.
Its has datetime of a user when the account was created.
This says if the user has been authenticated.
Methods of user object
1. get_username():
If it's possible to swap out the user model, We should use the get_username method in place of referencing the
username directly.
2. get_full_name():
This method combine the first and last name and give a space between names and then return it.
3. get_short_name():
It returns the first Name
4. set_password():
This method is used to set password.
5. set_unusable_password:
If there is no password given by the user then this method is used.
6. check_password():
This method is used to check that is the password is correct or not. If correct then it returns True and if
not then False.
7. get_user_permission():
This method return all the permission of an user as string. There is an optional parameter obj=None. To know
about a specific permission of user use this parameter.
8. get_group_permission():
This method return all the permission of an group as string. There is an optional parameter obj=None. To know
about a specific permission of group use this parameter.
9. get_all_permission():
This method return all the permission for both group and user as string. There is an optional parameter
obj=None. To know about a specific permission use this parameter.
10. has_perm():
has_perm return True if a user has the specified permission.
11. has_perms():
has_perms return True if a user has each of the specified permission.
12. has_module_perms(packageName):
has_module_perms return True if a user has any permission in a package. This package name is given inside
has_module_perms bracket.
13. email_user(subject,message,from_email="" ,**kwargs):
This method send a email to the user. If the value of form_email parameter is None then django use
DEFAULT_FORM_EMAIL
UserManager methods
User model has custom manager which have some methods.
Let's see those methods:
1. create_user(username,email="",password="",**extra_fields):
We can create user by using create_user method. By this method you can create, save and return an user. If you
create user by this method then is_active will be set as True. If there is no password is given by user then
set_unusable_password() method will be used.
2. create_superuser(username,email="",password="",**extra_fields):
Working is same as create_user but here is_staff and is_superuser set as True.
Group object fields
1. name:
You can pass here any characters. It is required and default length is 150.
2. permissions:
Many-to-many field permission.
Permission object fields
1. name:
This field is required.Default length is 255 characters.
2. codename:
This field is required and default characters length is 100.
Let's create a basic sign up form using UserCreationForm
Here we will not do any modification. We will just simply create this form.
Step 1:
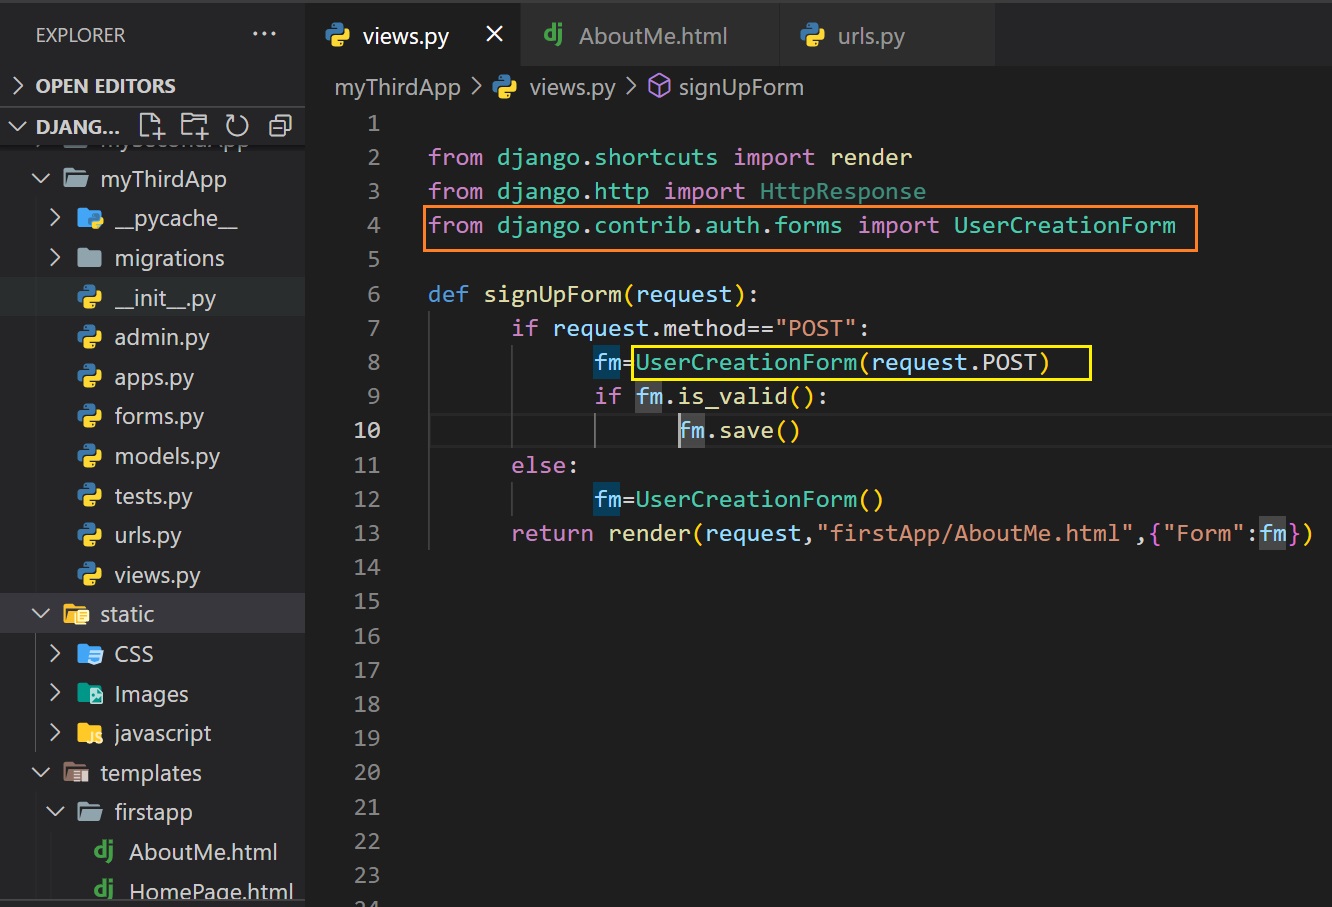
At first we have to create the view function.
In the view function at first we have to import UserCreationForm form django.contrib.auth.form
from django.contrib.auth.forms import UserCreationForm
Now we have to create a view function but in the view function we have to create form object for UserCreationForm.
Step 2:
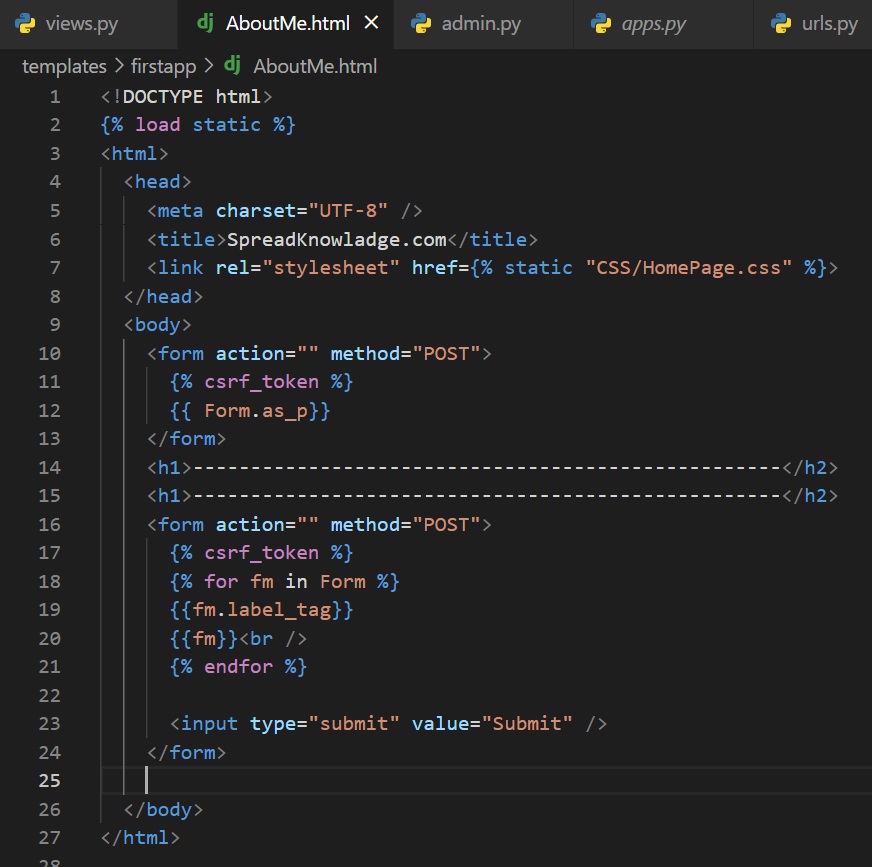
Let's create template. Here we will display the template in two different ways.
In first technique we
will normally display the form but
in second technique we will use a form loop .
Step 3:
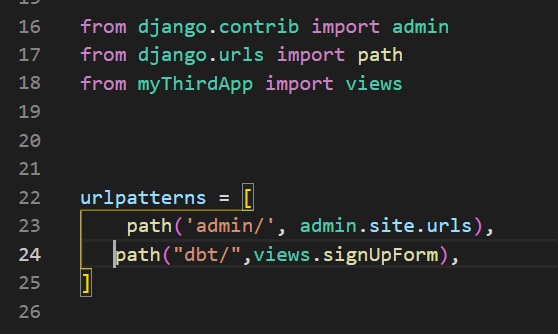
Let's define url.
Step 3:
Step 4:
Let's see the output
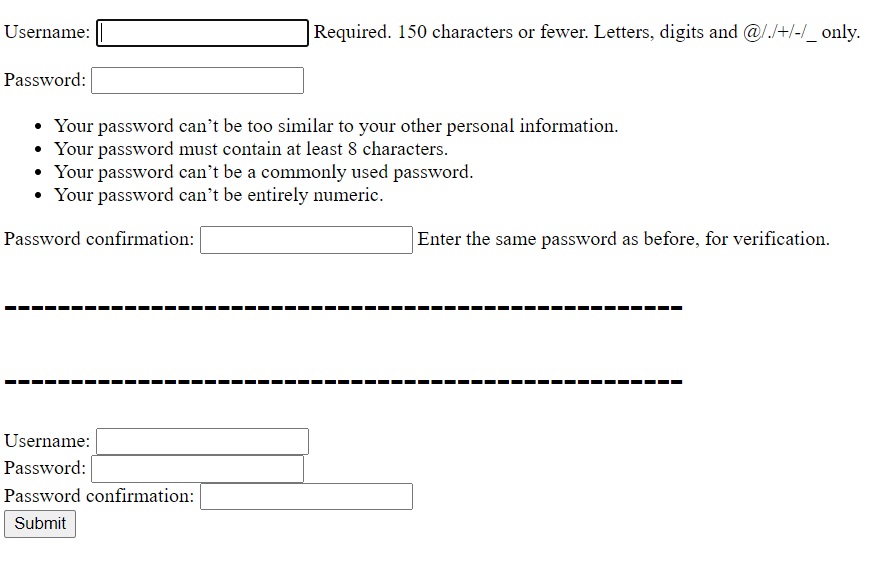
Now let's do some modification on basic sign up form which we created using UserCreationForm
The process is, we will inherit the default form and after inherit we will do the modification or changes.
Here the modification process is same as model form. It means what you can perform in model form, same things
you can perform here
Step 1:
At first created a forms.py file in the application file.
Then go inside that file.
At first we have to import User model class, UserCreationForm and forms.
from django.contrib.auth.models import User
from django.contrib.auth.forms import UserCreationForm
from django import forms
Step 2:
Let's inherit the UserCreationForm and create our own model class.
Here you can use any name for the model class. In the bracket of class name you have to write UserCreationForm
for inherit. Then other working is same which you have learned in model class like create meta class, etc.
Here in meta class, you have to use User as model. Same type of modification you can do like change labels,
set widgets, error message, help text, etc you can do which you have learned in model form.

Look in the image there is no fields for password and password confirmation field in fields variable. But in
the output you will see those two fields. It happens because in meta class you can modify those fields which
are coming from User model class but these two field are coming form UserCreationForm. So to modify those two
fields, we have overwrite those fields. We overwrite those fields in the blue marked area. In the blue marked
area you can see variable name password2. This the value of Password confirmation field name attribute. To see
the value of field name attributes go to the webpage, do right click and then go to view page source.
Step 3:
In view function, you have to just create object for the new model class and also have to import that model
class. To do this you have to just use the new model class name.
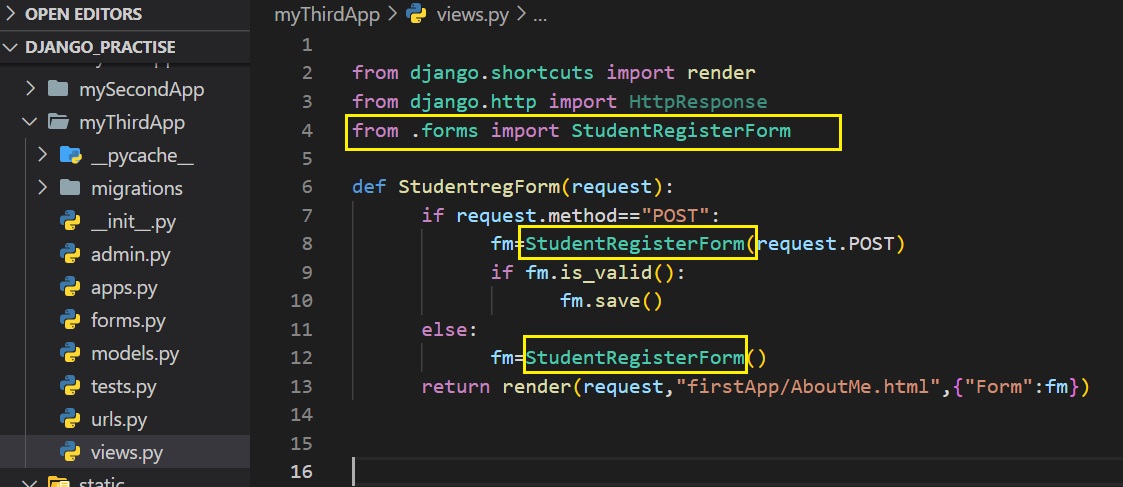
Other things will be same.
Now let's check the output

Let's create a login form and then redirect user into another page after login
The working flow is, first user have to register or signup to create an account. After creating an account the
user can login using the username and password. We already discussed about how to create a signup form. Now
let's see login form.
Step 1:
At first go to views.py file and create a view function for login form

Look in the image, we can see two view functions. Blue marked view function is for that page where we want to
redirect the user after login. Green marked area view function is for login page. You have to import all that
things which are present in yellow marked area. Here we can see four if conditions.
Second if
condition work is, if the request method is POST then register the form which is coming form
AuthenticationForm(brown marked area). In the bracket of AuthenticationForm you have to pass request=request
and data=request.POST.
In third if condition we are checking that is the data is valid or not. If
the data is valid then we are taking the clean data and storing in variable. After that we are passing the
clean data to the authenticated form fields(gray marked area) and again storing it in a variable(in this case
userobj).
Fourth if condition works is, if the variable(in this case userobj) is not None then login the user and
redirect the user into a page.
First if condition work is, if the user is authenticated then all operation of log in will happen and if the
user is not authenticated then the operation of login will not happen and the user will show a empty login
form.
Look after login the user will redirect into another page. So for that page we have to create a view function
and that view function is present in blue marked area. Here we also use a if condition. The working is same as
login view function first if condition. This means, if the user is authenticated, only then the user will
redirect to that page if not then the user will redirect to the login page.
Here minimum two html page will be needed one is for login form another is for redirect page, but you must
need a register or a signup form. Because you can login if you are registered.
Step 2:
Let's create urls.

Here the yellow marked area ul is for login view function and red marked url is for redirect page. Here you
must give a name of the urls.
Step 3:
Let's create the template file for login page.
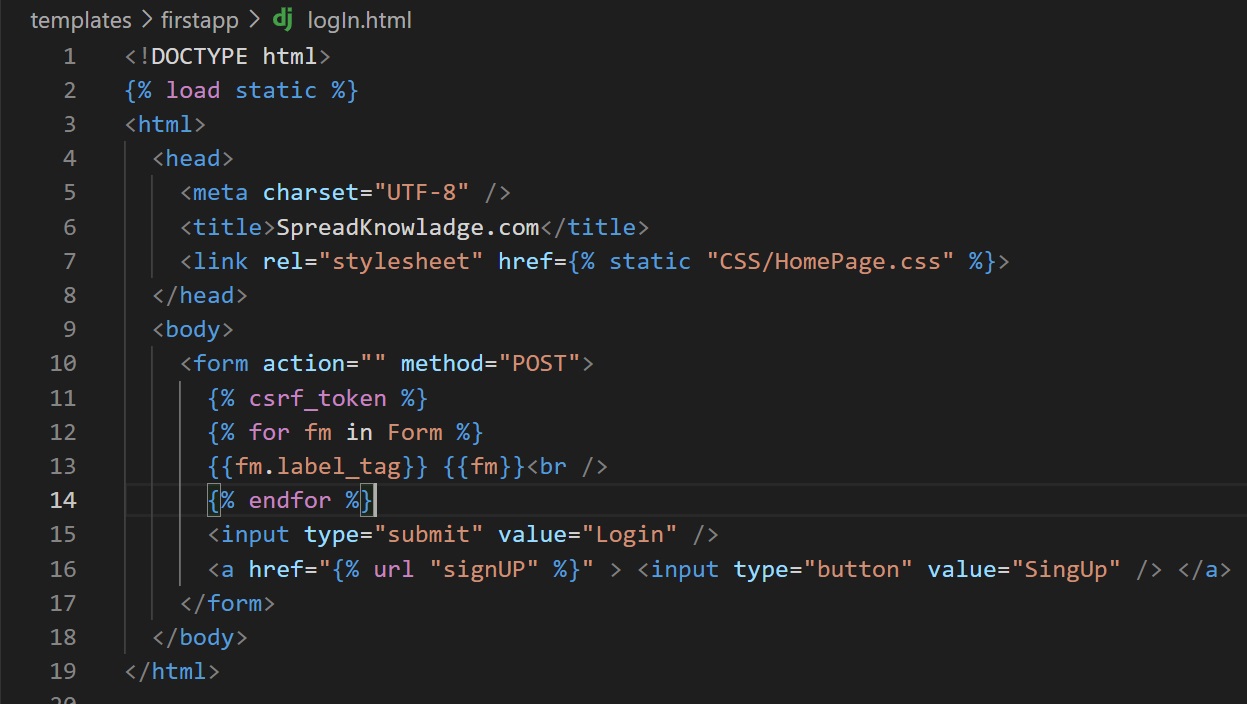
Step 4:
Let's create template for redirect page.

Now at first create a user by using signup form and then do login.
Let's logout
Step 1:
To create logout at first import logout.
To import write:
from django.contrib.auth import logout
Step 2:
Then create a view function.
The view function work will be, if the user request for logout then the user will be redirected into login
page.

Step 3:
Let's create an url

Step 4:
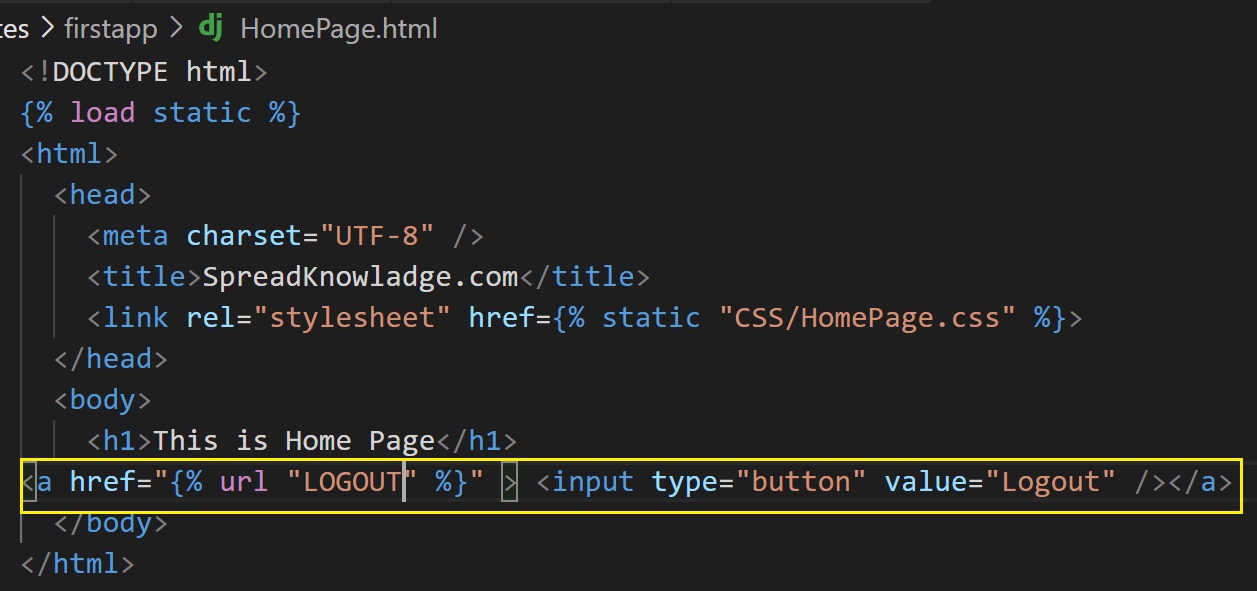
Now we have to create a logout button and in url of the button we will pass the url of login page so that
after clicking on the logout button the user should redirect to the login page.
