Learn HTML
Learn CSS
Learn Javascript
Django Introduction
Django Project & File Structure
Django Create & Structure Directory of Application
Django View
Django Template
Django Dynamic Templates Using DLT
Django if,elif,else & for loop tags
Django Static Files
Django Template & Static File Inheritance
Django Hyperlinks
django Get Post Csrf
Django Administration
Django Model class
Django Form
Django Get Form Data & Data Validation
Django Redirect Page After Submit
Django Save,Update & Delete Form in database
Django Dynamic URL
Django User Authentication System
Django model class
What is model?
It is the definitive source of information about the data. It contains the essential fields and behaviors of the stored data. Each model maps to a single table in a database.
What is Model class?
Model class represent a table in a data base. Each or single attributes of model represents a single database
filed.
It means one attribute = one field.
The default database of django is sqlite.
How to create model class?
To create model class, models.py file will used.You will get this file inside application folder. You will
create your model class inside this file.
Syntax of creating model class:
field_name_1=models.FieldType(arguments,options)
field_name_2=models.FieldType(arguments,options)
Here we created two fields but you can create how many you want.
Here in the bracket of class, you have to write models.Model. You can't change it.
Field name will be the column of database table. It means, here you are creating column for a database
table.
FieldType is the type of field name or column.
Example: email,password etc.
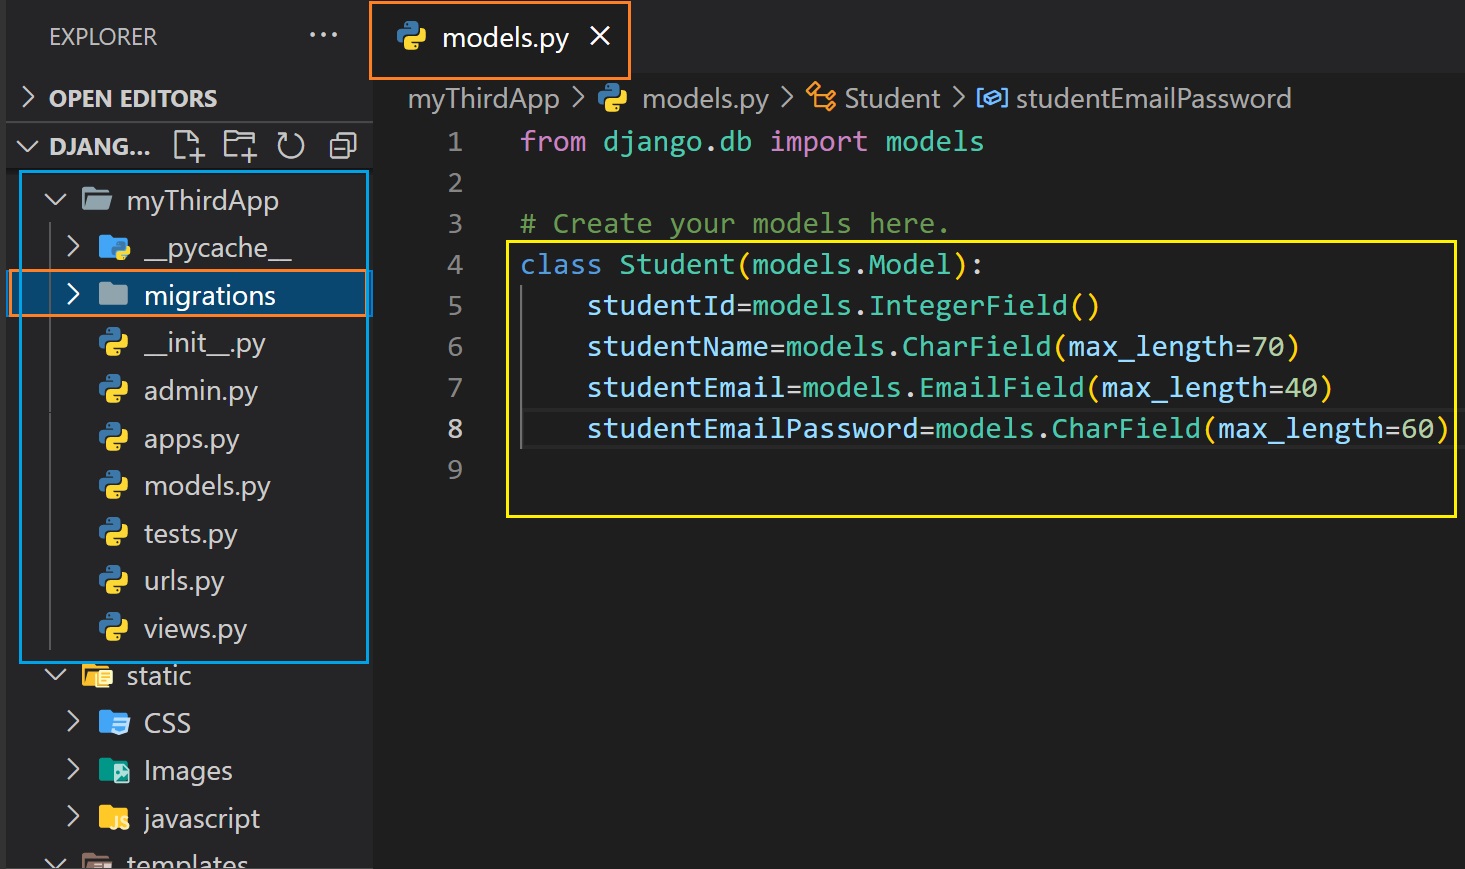
class Student(models.Model):
studentId=models.IntegerField()
studentName=models.CharField(max_length=70)
studentEmail=models.EmailField(max_length=40)
studentEmailPassword=models.CharField(max_length=60)
Here in the class, we created four fields studentId, studentName, studentEmail and studentEmailPassword. It
means that we created a table in the database and in the table we have columns like student id, name, email
and password.
We know that student id is numerical integer data like 1, 1001, etc. That why we pass the field type
IntegerField. By doing this user will only able to input integer number in this field. Similarly in student
name can be only characters. That's why we used CharFiled. Here we also pass an arguments max_length=70. It
means that the length of name must be less than equal 70. User can't put a name which contain more than 70
characters.
Look in the previous example, we didn't make any column as primary key but it is necessary. But if you don't
do then automatically a new column will be created which name will be id, fieldtype will be integer with auto
increment. Auto increment means the value of this column cell will be automatically increase by one(by
default) in the next cell.
Let's create table in database using the model
After creating a model, to use that model means creating a table in the database according to the model follow the steps:
Open terminal/command prompt/powershell and then run the command:
python manage.py makemigrations
Step 2:
Then run this command:
python manage.py migrate
By using these command, you will create a table in the database according to model.
Suppose we make changes in the model. Then you have to run these two commands again to see the changes in
database. It means you have to run these two commands each time you make changes in you model. If you don't
make any changes in your model then you don't need to run these two commands.
Let's see the database table in django administration
Previously we created a database table. But if look in the admin panel then you will see there is not tables
named Student. To get the table in admin panel, you have to register the model class in django admin.
Steps to register model class in admin:
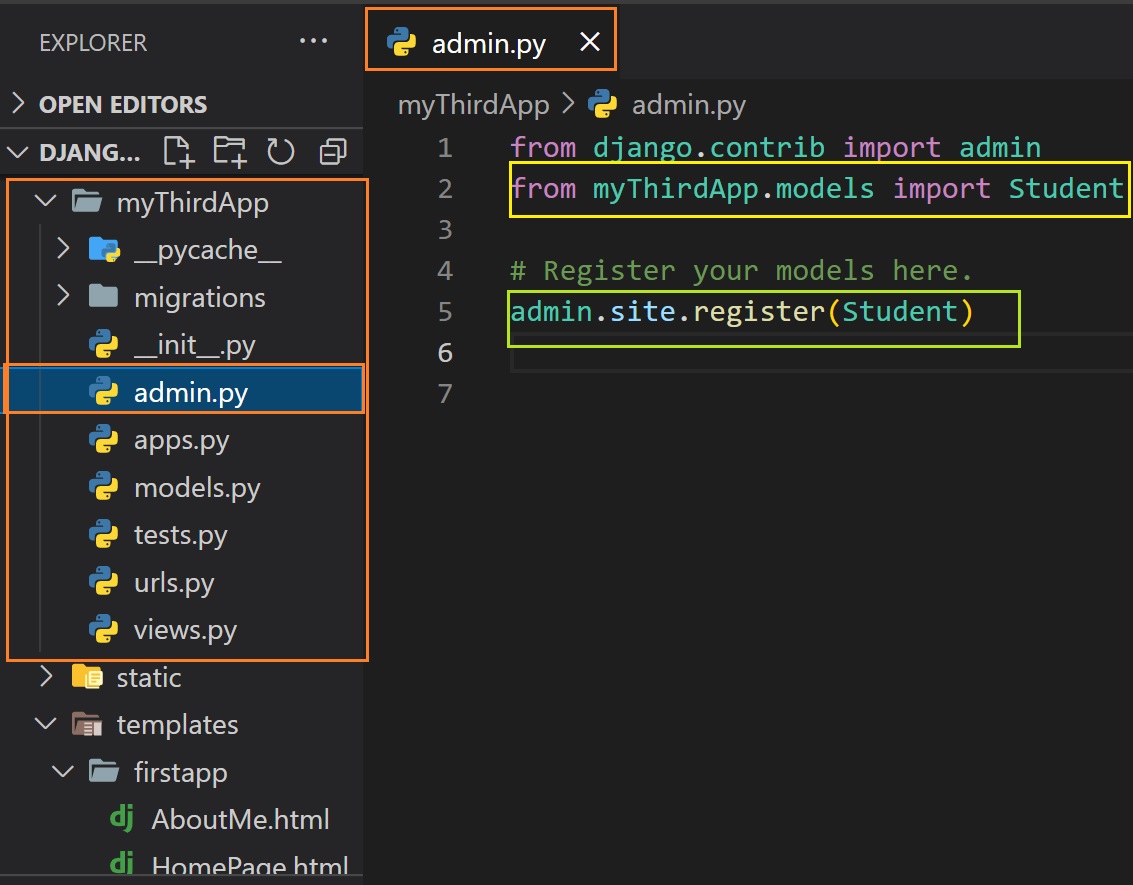
Go the admin.py file present in application folder.
Step 2:
Then import your own model class here that you have created in this application.
Step 3:
After importing write a simple code:
admin.site.register(ModelClassName)
Now if you go to the admin panel then you will see the table.

Now if you go inside the table, you will see the table is empty. But you will see add option on the left top side.

If you click on that option then a dialog box will open. There fill the information and click on save. By doing this you are adding a row means a student info in the table.

After adding, if you go inside of the table then you will see the records like this:

If you click on the record or row then you will see options for edit the record or row and also can save it.
You will also see options for delete the record or row.
How to see the records in the form of table in the django administration?
To do this we have to create model admin class.
We have to create admin model class in admin.py files present in the application file.
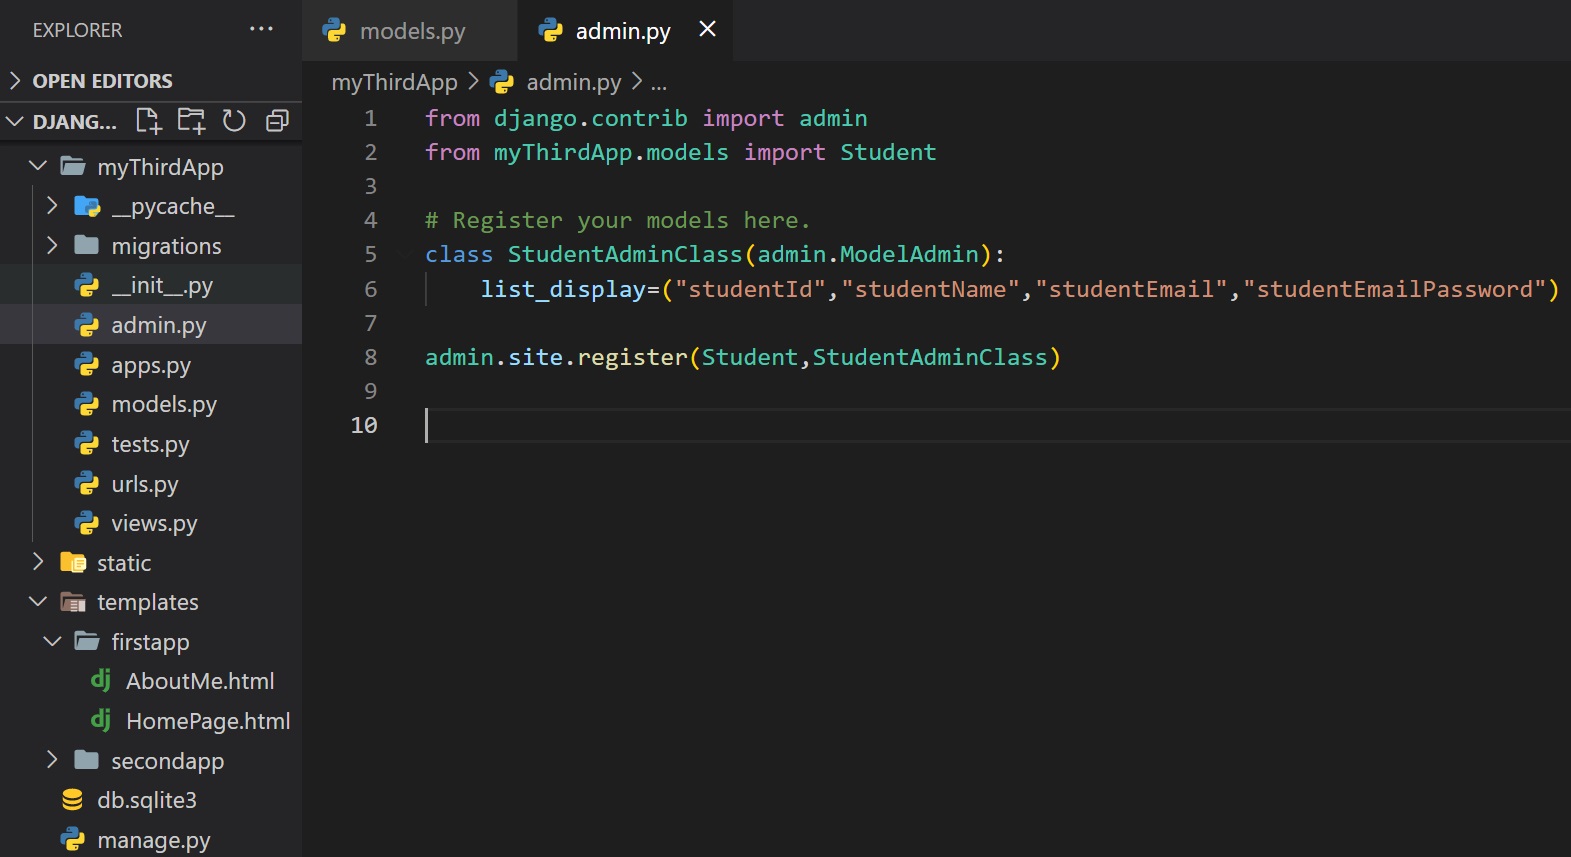
class ModelAdminClassName(admin.ModelAdmin):
list_display=("fieldName1","fieldName2",....)
After this we have to register the admin model class.
Syntax:
admin.site.register(ModelClassName,ModelAdminClassName)
Now let's go to admin panel and see. Now if you want to edit or delete the records then click on each row primary key value cell.

Let's show or display the table to the user in webpage
all():It returns a copy of current queryset. If you want to get the data of whole table at once then you will use this method or function.
ModelClassName.objects.all()
get():If you want to get a single data from the database table then use this function of method. To get single value you will use primary key column.
Suppose in your table id is the primary key column and you want to get id number 4 data.
In this case write:
Step 1:
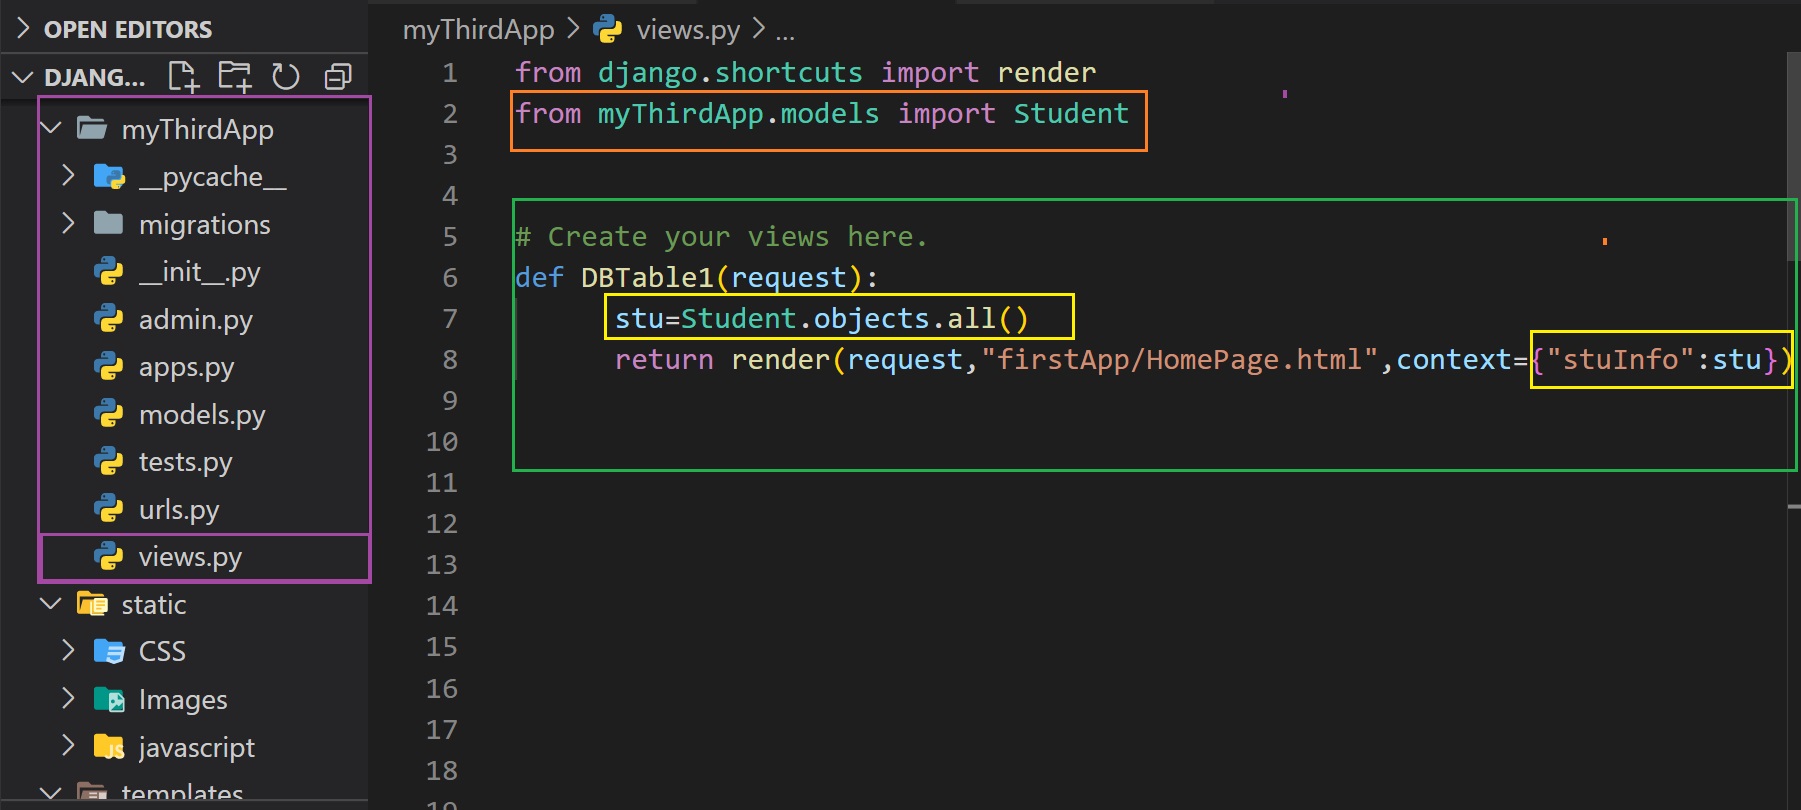
Import your own model class in views.py file from models.py file.
from applicationName.models import ClassName
Example:
from myThirdApp.models import Student
Here is our thirdApplication name and Student is the class name.
Step 2:
Create view function.You will create this view function in that application where you wrote code for create
model.
def function_name(request):
variable_name=className.objects.all()
return render(request,"path/htmlFile_name.extension",context={"key":variable_name})
Example:
def DBTable1(request):
stu=Student.objects.all()
return render(request,"firstApp/HomePage.html",context={"stuInfo":stu})
Step 3:
Then we have to define url for this view function.We have learn two methods for define url.You can follow any
one.
urlpatterns = [
path('admin/', admin.site.urls),
path("route/",views.function_name),
]
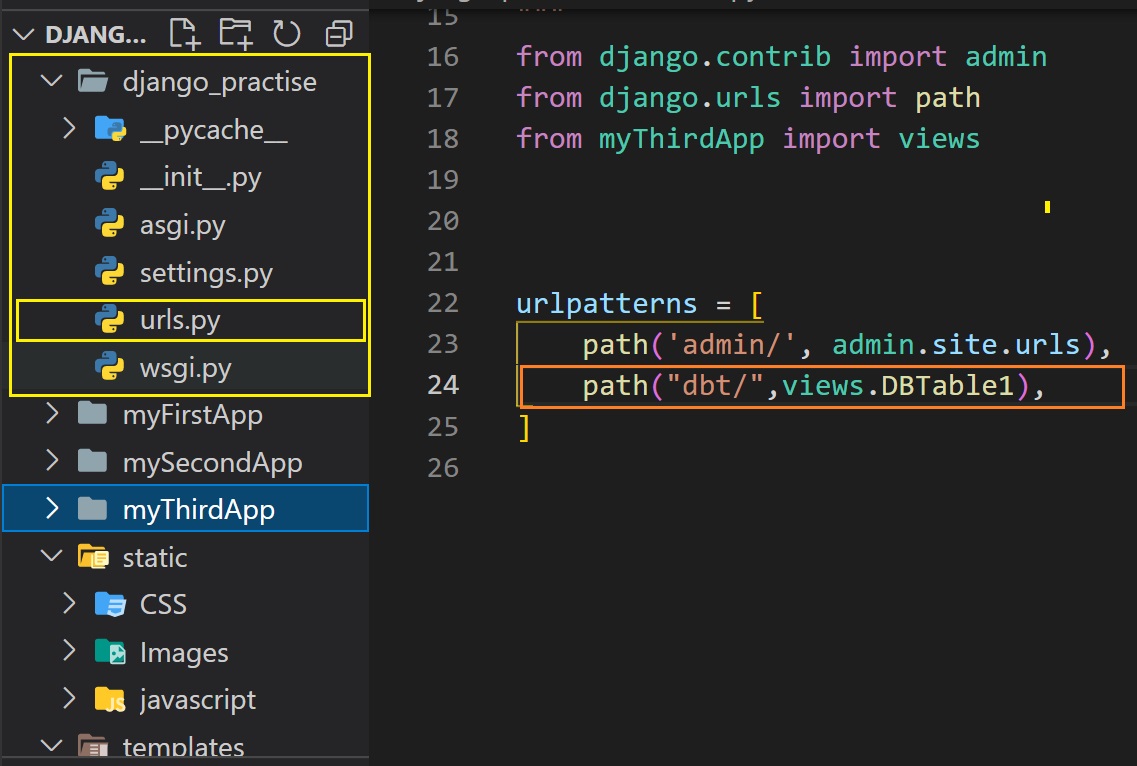
Example:
urlpatterns = [
path('admin/', admin.site.urls),
path("dbt/",views.DBTable1),
]
Here Student is the class or model name. In context parameter, we will pass value as a dictionary. Now we will
use the key value of context parameter in the template file.

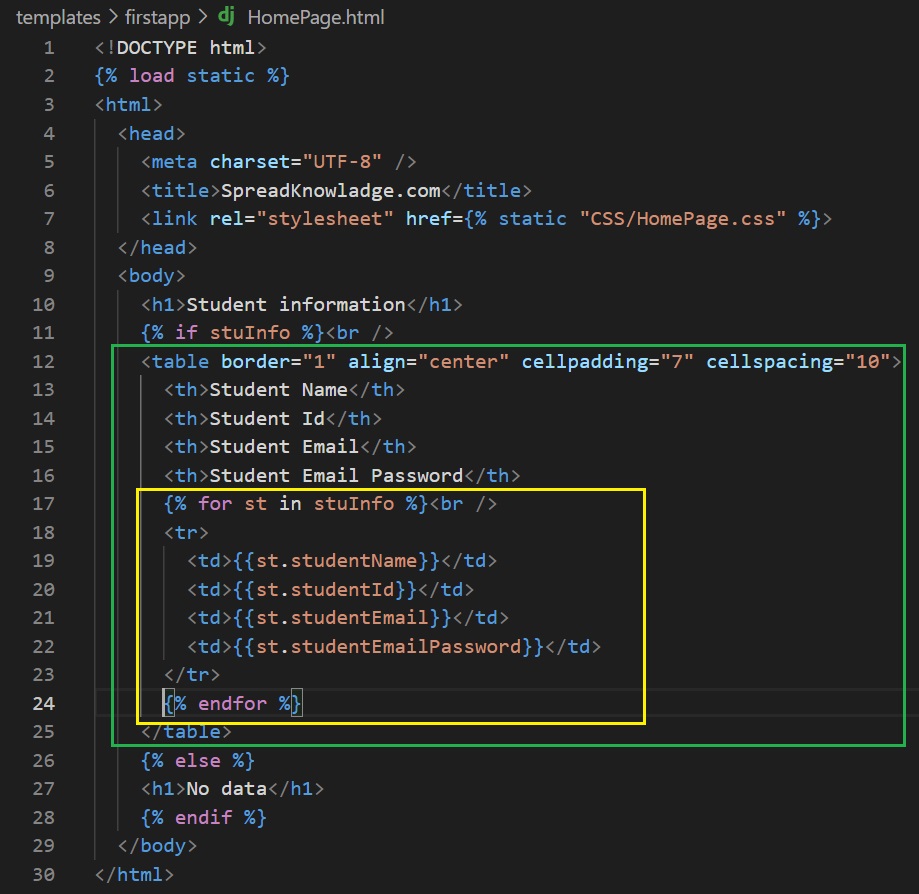
If you want to view the data as a table:
Rules to create field name
Built-in field arguments:
It's value is True of False(default). If you pass true then django will store empty value as null in the cell of a column.
Example: null=True
Here pass a default value for a column. Suppose user forget to fill a column value or some row or we don't have the data of a field of a column, in this case if we pass a default value in the column then if value is missing from any cell or field of the column then that cell will be filled by the default value.
Example: default="No value"
It has value True or False(default).
If you want to make any column as primary key then pass primary_key=True as a argument while creating the column.
It has value True or False(default). If you pass unique=True then it means that the values of these column must be unique.
Built-in field types
If you pass this filed type then the column will be only able to take integer numbers as cell value. Value from -2147483648 to 2147483647.
Example:Student_Id=models.IntegerField()
This is also similar like IntegerField but this can take value from -9223372036854775808 to 9223372036854775807.
Example:Student_PhoNumber=models.BigIntegerField()
If you pass this filed type then the column will be only able to take string/characters/text as cell value.I t means, it is used to create a text field. Here we have to define the maximum length of a string. For define the length, we use max_length argument and here we pass the length. Suppose we pass 70. It means the user can input text or string less and equal to 70 characters(include space and other symbol underscore, comma, dot, etc).
Example:Student_name=models.CharField(max_length=70)
It is used to create a large text field. Here we can also define max_length. We basically use this filed in columns like which contain comment,description, etc.
Example:Student_description=models.TextField(max_length=180)
For boolean value like True or False you can use this field.
Example:Student_status=models.BooleanField()
For email you can use this field. It has a optional argument max_length
Example:Student_email=models.EmailField(max_length=60)
For urls, you can use this field. It takes optional argument max_length. If you don't use this argument then the default max length is 200.
Example:Student_URL=models.URLField()
For binary data like image, you can use this field. This field has an optional argument max_length.
Example:Student_Img=models.BinaryField()