Learn HTML
Learn CSS
Learn Javascript
Django Introduction
Django Project & File Structure
Django Create & Structure Directory of Application
Django View
Django Template
Django Dynamic Templates Using DLT
Django if,elif,else & for loop tags
Django Static Files
Django Template & Static File Inheritance
Django Hyperlinks
django Get Post Csrf
Django Administration
Django Model class
Django Form
Django Get Form Data & Data Validation
Django Redirect Page After Submit
Django Save,Update & Delete Form in database
Django Dynamic URL
Django User Authentication System
Django form
Using HTML we can create form but here we will learn how to create form using django.
How to create form using django?
Step 1:
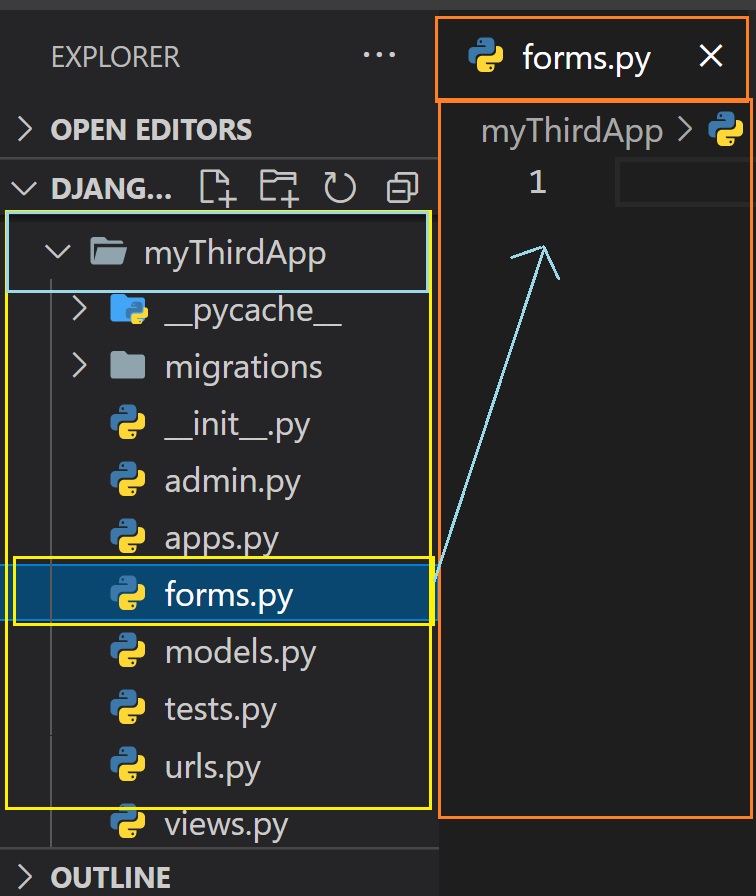
At first go inside application and then create a file named forms.py. Inside this file, we will write our code
to create form.
Step 2:
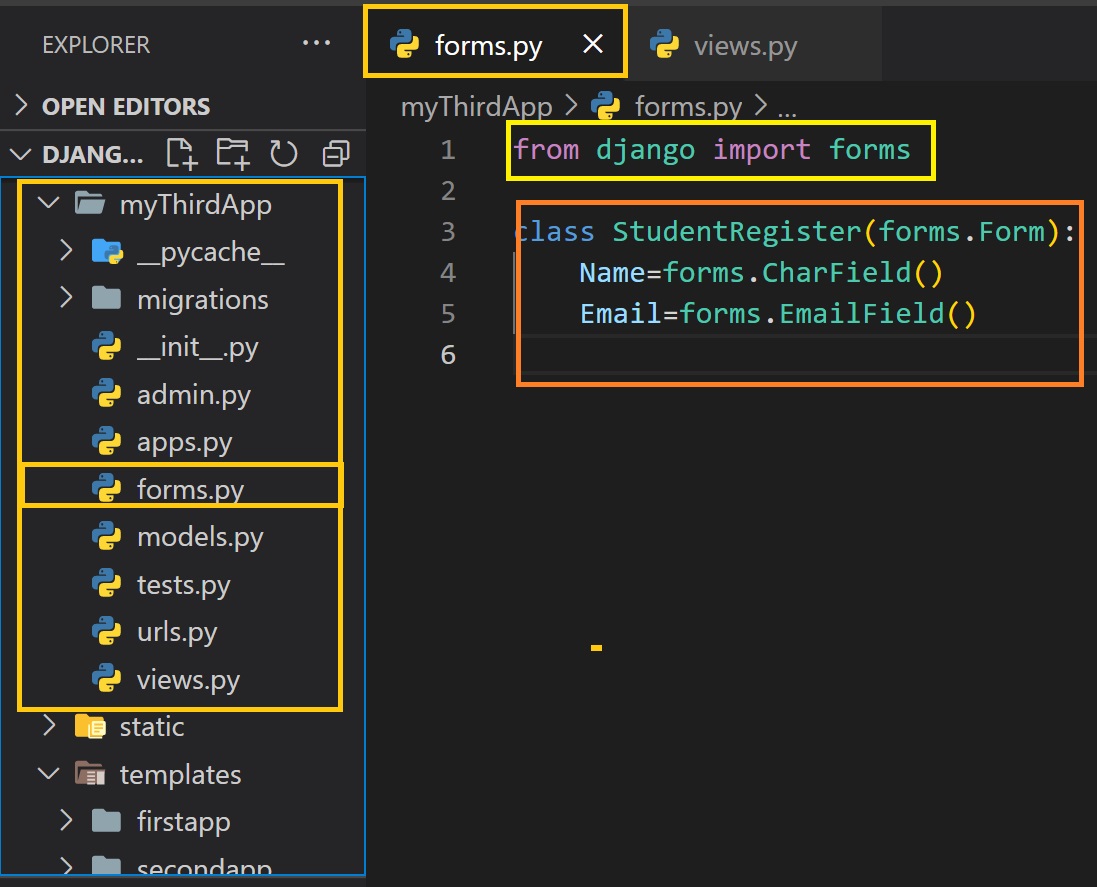
Import forms from django inside forms.py file
from django import forms
Step 3:
Create form class inside forms.py file
Syntax:
class FormClassName(forms.Form):
fieldName=forms.FieldType()
fieldName=forms.FieldType()
Example:
from django import forms
class StudentRegister(forms.Form):
Name=forms.CharField()
email=forms.EmailField()
Look while creating forms the length of CharField() does not required.
Step 4:
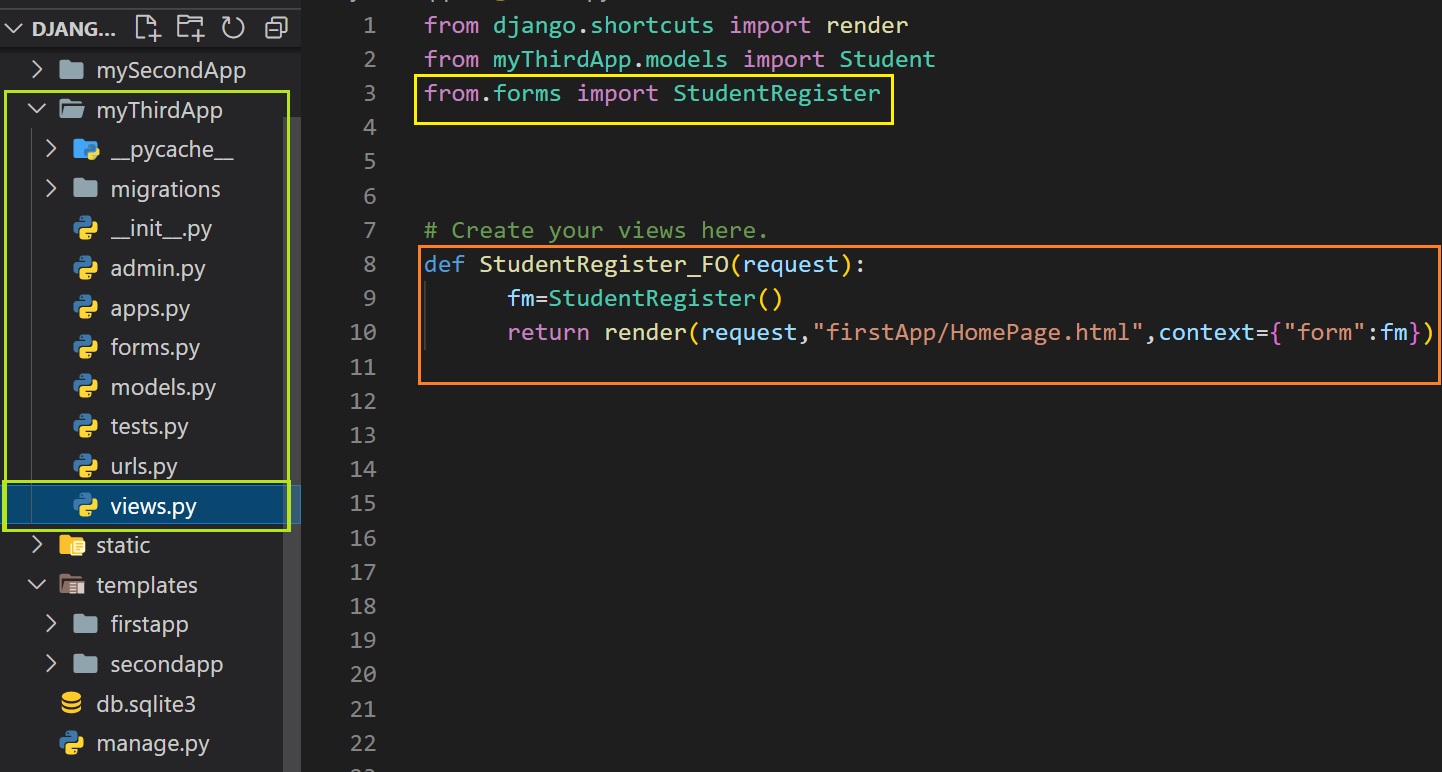
To display the form to user in html files at first create a object form class in views.py file present in the
application folder.
To create object in views.py file at first we have to import forms.py file in views.py file.
from.forms import FormClassName
Let's create object:
def viewFunctionName(request):
object_name=FormClassName()
return render(request,"path/htmlFile.extension",context={"key":object_name})
Example:
from.forms import StudentRegister
def StudentRegister_FO(request):
fm=StudentRegister()
return render(request,"path/htmlFile.extension",context={"form":fm})
Steps 5:
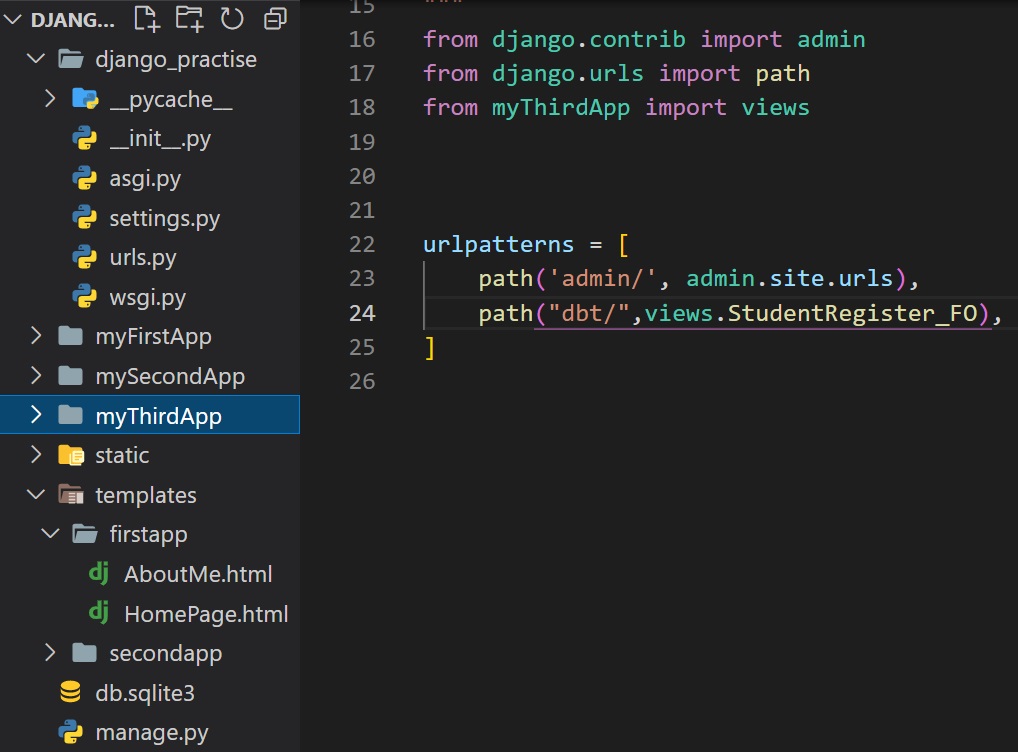
Define a url for the view function.
Step 6:
Let's use this form in html page.
Remember one thing in django form, you will not get form tag and button. To get those, you have to define
those by your self.
<form action="" method="get">
<table> {{form}}
<input type="submit" value="Submit">
</table>
</form>
{{form}} will render all and also will display all.
But if you want to print a single filed then write:
<form action="" method="get">
<table>
{{form.Name}}
{{form.Email}}
<input type="submit" value="Submit">
</table>
</form>

Form rendering options
{{form}}:
This will render all the field.We have already seen it.
<form action="" method="get">
<table>
{{form}}
</table>
<input type="submit" value="submit">
</form>
{{form.as_p}}
If you use this then all the fields will be warped in p tag before displaying.
<form action="" method="get">
<table>
{{form.as_p}}
</table>
<input type="submit" value="submit">
</form>
{{form.name_of_field}}
This will render file manually as given.
<form action="" method="get">
<table>
{{form.name_of_field}}
</table>
<input type="submit" value="submit">
</form>
{{form.as_ul}}
If you use this then all the fields will be warped in li tag before displaying.
<form action="" method="get">
<table>
{{form.as_ul}}
</table>
<input type="submit" value="submit">
</form>
How to configure id attribute and label tag?
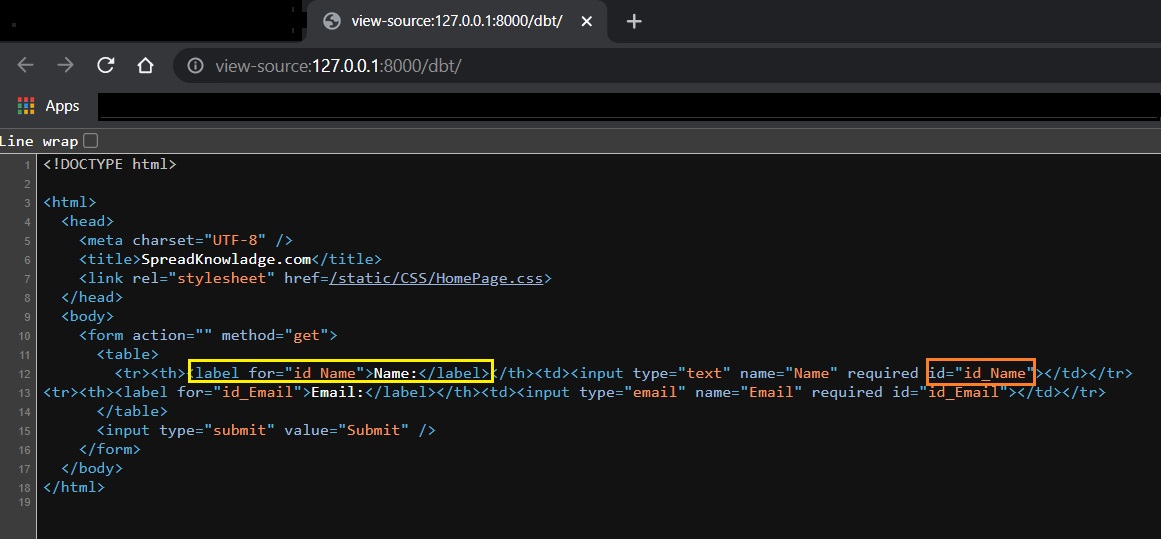
id attribute:
If you view the form page you will see id attribute(orange marked area). By default the value if id attribute
will be id_filedName.
You can change that value.
To change the value go to views.py file and then go to form object.
Suppose you want fir_name( default is id_name) as id value.
To do this you have to write in the bracket:
fm=StudentRegister(auto_id="fir_%s")
return render(request,"firstApp/HomePage.html",context={"form":fm})
Now if you have any other word write that in the position of fir.
Suppose you want that id value should be the field name.In that case you have to pass True.
fm=StudentRegister(auto_id=True)
return render(request,"firstApp/HomePage.html",context={"form":fm})
Suppose you want to disable or remove the id and label tag then pass value False.
fm=StudentRegister(auto_id=False)
return render(request,"firstApp/HomePage.html",context={"form":fm})


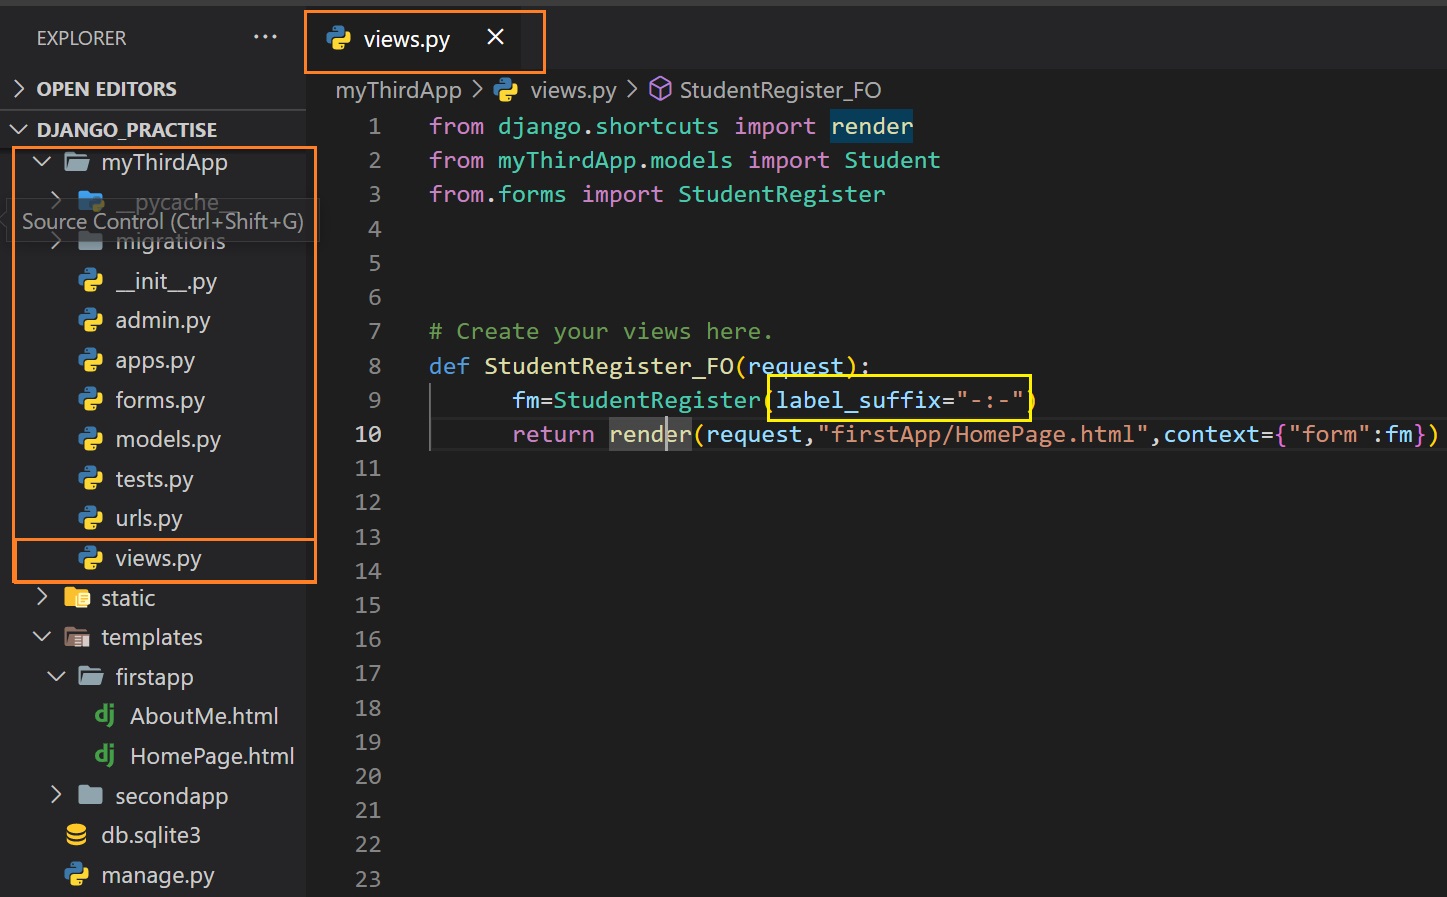
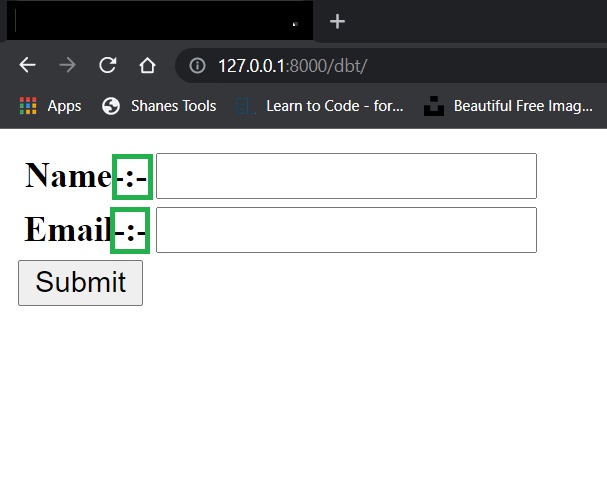
Label tag:
If you see the form then you will see a colon between field name and field. Default value of label tag is
colon(:).
But you can change it
To change the value go to views.py file and then go to form object and in the bracket pass the code given
below:
label_suffix=""
If you leave this quotation empty, it means, there is no label.
If you want a space then give a space in the quotation.
label_suffix=" "
If you want to pass any character then pass that character inside quotation.
label_suffix="-"
Initial value for field
Sometimes we can see in the form field that in the field there is something already written. For example in
the name field we can see enter name, in the email field, a sample email, etc.
Those values are called initial value.
To put initial value, go to views.py file where you wrote view function for the form.
There go inside the bracket of the form object and write:
Example:
def StudentRegister_FO(request):
fm=StudentRegister(initial={"Name":"Enter Name","Email":"xyz@gmail.com"})
return render(request,"firstApp/HomePage.html",context={"form":fm})


How to render form manually?
We have already seen form rendering options like:
{{form}} used to render full form.
{{form.name_of_field}} used to render a particular field from form.
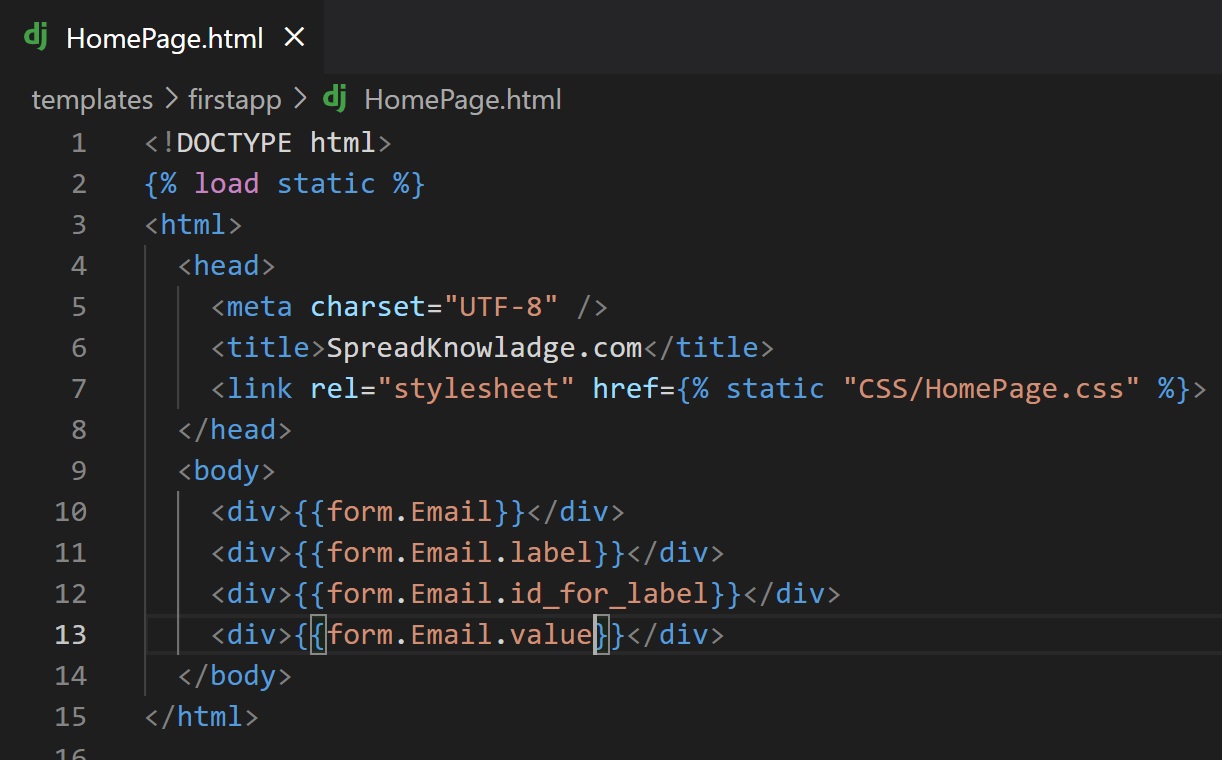
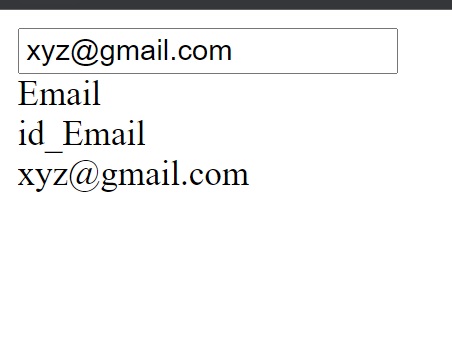
Let's see some methods to render field, elements tag of a form separately:
Render label of a field:
Example:{{form.Email.label}}
Get label tag:
Example:{{form.Email.label_tag}}
Get id of particular field:
Example:{{form.Email.id_for_label}}
Get a particular field initial value:
Example:{{form.Email.value}}
Get the hidden fields:
To use this, we will use conditions, like if it is hidden field then do this and if not then do this.
{% if form.Email.is_hidden %}
Code
{% endif %}
Form Filed arguments
required:
It means the user must fill this field to submit the form. By default the of required is True but if you don't
want required then make it false
Field_name=forms.FiledType(required=False)
Example:
Name=forms.CharField(required=False)
error_message:
To show error message in a particular field use this.
Field_name=forms.FiledType(error_message={"Error type":"message"})
Example:
Name=forms.CharField(error_message={"Required":"You must enter you name"})
initial:
We already saw a method to pass initial value but you can also pass the initial value in the filed type.
Field_name=forms.FiledType(initial="value")
Example:
Name=forms.CharField(initial="Enter name")
disabled:
If you want to disabled any filed then use this.This argument has two value False(default) and True.For
disable pass True.
Field_name=forms.FiledType(disabled=True or False)
Example:
Name=forms.CharField(disabled=True)

widget:
The type of field we defined in widget. To create field we have types like CharField, EmailField, etc. So we
can say that we already have some predefined fieldType. There are lots of fieldType and each fileType is not
predefined.
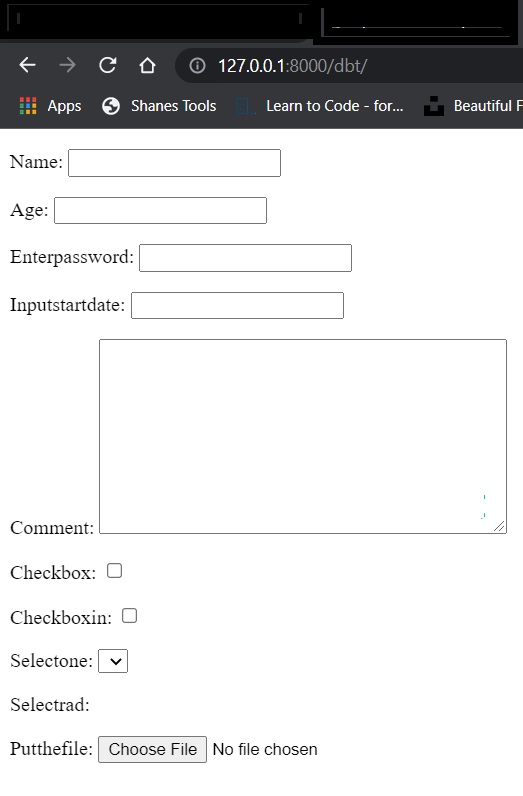
For example we don't have any predefined field for textarea,password, number, url, etc. To create those fields
we will use widget.
At first we create any field like charfield and then using widget argument we change the fieldType into
another type.
Suppose we create a field which type is CharField(). Now using widget we can convert that type into any other
like textarea.
Built-in widgets
Syntax:
FieldName=forms.FieldType(widget=forms.FieldType())
Example:
Comment=forms.CharField(widget=forms.TextInput())
Syntax:
FieldName=forms.FieldType(widget=forms.FieldType())
Example:
Comment=forms.CharField(widget=forms.NumberInput())
Syntax:
FieldName=forms.FieldType(widget=forms.FieldType())
Example:
Comment=forms.EmailField(widget=forms.EmailInput())
Syntax:
FieldName=forms.FieldType(widget=forms.FieldType())
Example:
URL=forms.CharField(widget=forms.URLInput())
Syntax:
FieldName=forms.FieldType(widget=forms.FieldType())
Example:
URL=forms.CharField(widget=forms.PasswordInput())
Syntax:
FieldName=forms.FieldType(widget=forms.FieldType())
Example:
URL=forms.CharField(widget=forms.HiddenInput())
Syntax:
FieldName=forms.FieldType(widget=forms.FieldType())
Example:
URL=forms.CharField(widget=forms.DateInput())
Here we have to pass the format of date and default format is DATE_INPUT_FORMATS.
Syntax:
FieldName=forms.FieldType(widget=forms.FieldType())
Example:
URL=forms.CharField(widget=forms.DateTimeInput())
Here we have to pass the format of datetime and default format is DATETIME_INPUT_FORMATS.
Syntax:
FieldName=forms.FieldType(widget=forms.FieldType())
Example:
URL=forms.CharField(widget=forms.TimeInput())
Here we have to pass the format of time and default format is TIME_INPUT_FORMATS.
Syntax:
FieldName=forms.FieldType(widget=forms.FieldType())
Example:
URL=forms.CharField(widget=forms.Textarea())
Syntax:
FieldName=forms.FieldType(widget=forms.FieldType())
Example:
URL=forms.CharField(widget=forms.CheckboxInput())
Syntax:
FieldName=forms.FieldType(widget=forms.FieldType())
Example:
URL=forms.CharField(widget=forms.CheckboxInput())
Syntax:
FieldName=forms.FieldType(widget=forms.FieldType())
Example:
URL=forms.CharField(widget=forms.Select())
Syntax:
FieldName=forms.FieldType(widget=forms.FieldType())
Example:
URL=forms.CharField(widget=forms.NullBooleanSelect())
Syntax:
FieldName=forms.FieldType(widget=forms.FieldType())
Example:
URL=forms.CharField(widget=forms.SelectMultiple())
Syntax:
FieldName=forms.FieldType(widget=forms.FieldType())
Example:
URL=forms.CharField(widget=forms.RadioSelect())
Syntax:
FieldName=forms.FieldType(widget=forms.FieldType())
Example:
URL=forms.CharField(widget=forms.CheckboxSelectMultiple())
Syntax:
FieldName=forms.FieldType(widget=forms.FieldType())
Example:
URL=forms.CharField(widget=forms.FileInput())
Syntax:
FieldName=forms.FieldType(widget=forms.FieldType())
Example:
URL=forms.CharField(widget=forms.ClearableFileInput())
Syntax:
FieldName=forms.FieldType(widget=forms.FieldType())
Example:
URL=forms.CharField(widget=forms.MultipleHiddenInput())
Syntax:
FieldName=forms.FieldType(widget=forms.FieldType())
Example:
URL=forms.CharField(widget=forms.SplitDateWidget())
This takes optional arguments like year,month

There is a attrs parameter which can be passed inside of bracket of fieldType. By this parameter we can see
raw html attributes.
For example, we want to apply css on the fields.To apply css we need to use class name in each field. We know
that class is a attribute of html tag. So we can use class attribute and pass a class name in the attribute by
using attrs parameter.
FieldName=forms.FieldType(widget=forms.filedType(attrs={"attributeName":"AttributeValue","attributeName":"AttributeValue","attributeName":"AttributeValue".....}))
Example:
Name=forms.CharField(widget=forms.TextInput(attrs={"class":"fieldClass"}))
Form Built-in fields and arguments
CharField():
This field is used to create text field.
Arguments:
1. empty_value="value":
If there is no value given by user then the value is given in the empty_value arguments will be set to the
filed.
2. max_length=intValue:
Here we define the maximum length of the characters.
3. min_length=intValue:
Here we define the minimum length of the characters.
4. strip=True or False:
Suppose user give extra spaces at first or in any position.Now if you pass strip=False then all the extra
space will removed and if you pass True then any spaces will not removed.Here True is default value.
Name=forms.CharField(max_length=50,min_length=5,error_messages={"required":"Please fill this field"},strip=False,empty_value="MobilePhone")
BooleanField():
This field will gives you a check box.
Here you can set an error message as like CharField()
IntegerField():
For number input this field type is used.
1. max_value=integerNumber
Here we define the maximum number of the field.
2. min_value=integerNumber
Here we define the minimum number of the field.
3. error_messages={"error_type":"Error massage"}
Age=IntegerField(min_value=18,max_value=60,error_messages={"required":"Please enter a number"})
DecimalField():
For number input this field type is used.
1. max_value=integerNumber
Here we define the maximum number of the field.
2. min_value=integerNumber
Here we define the minimum number of the field.
3. max_digits:
Here we pass a integer value.Here we define the total number of digits of a number.
4. decimal_places:
Here pass the value for decimal places.
5. error_messages={"error_type":"Error massage"}
Age=DecimalField(min_value=18,max_value=60,error_messages={"required":"Please enter a number"},max_digits=6,decimal_places=3)
FloatField():
For number input this field type is used.
1. max_value=integerNumber
Here we define the maximum number of the field.
2. min_value=integerNumber
Here we define the minimum number of the field.
3. error_messages={"error_type":"Error massage"}
Age=DecimalField(min_value=18,max_value=60,error_messages={"required":"Please enter a number"})
URLField():
For email input this fieldtype is used.
Arguments:
1. empty_value="value":
If there is no value given by user then the value is given in the empty_value arguments will be set to the
filed.
2. max_value=integerNumber
Here we define the maximum number of the field.
3. min_value=integerNumber
Here we define the minimum number of the field.
4. error_messages={"error_type":"Error massage"}
Name=forms.URLField(max_length=50,min_length=5,error_messages={"required":"Please fill this field"},empty_value="MobilePhone")
EmailField():
For email input this fieldtype is used.
Arguments:
1. empty_value="value":
If there is no value given by user then the value is given in the empty_value arguments will be set to the
filed.
max_value=integerNumber
Here we define the maximum number of the field.
2. min_value=integerNumber
Here we define the minimum number of the field.
3. error_messages={"error_type":"Error massage"}
Name=forms.EmailField(max_length=50,min_length=5,error_messages={"required":"Please fill this field"},empty_value="MobilePhone")
There are many more. You can check that in django documentation